
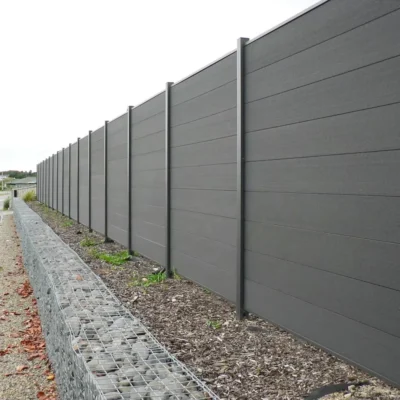
One question we hear quite often before an order is placed is: “Is composite fencing difficult to install?” For most modular WPC fence systems, the answer is no—as long as the boards, posts, rails and accessories are matched correctly.
In our export projects, the WPC boards are rarely the difficult part. Most installation problems start earlier, with the layout: post positions, ground fixing, corners, gate openings, clearances and small accessories.
This guide covers the general installation method we normally discuss with distributors, contractors and project buyers. Post spacing, footing size, fixings and expansion clearance can vary with the fence model, height, site conditions, wind exposure and local requirements, so the drawing for the actual product should always be followed first.
Table of Contents
ToggleQuick Answer: How Is Composite Fencing Installed?
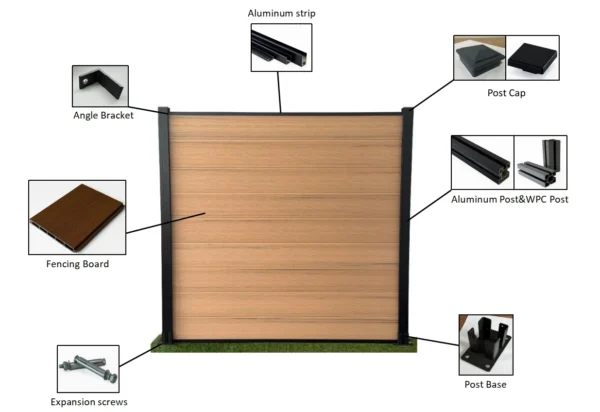
A typical composite fence is installed in six basic stages:
- Plan the fence line, height, corners, gate openings and installation surface.
- Install the composite fence posts: use matched base plates on suitable concrete, or longer posts set into concrete footings on natural ground.
- Install the bottom rail and check that it is level.
- Insert the WPC fence boards between the posts and keep the required expansion clearance.
- Install the top rail, finishing profiles and post caps.
- Check post alignment, fixings, gate movement and all exposed edges before handover.
For a straight fence run, the assembly is usually simple. Corners, slopes, mixed ground conditions and gates require more planning because they can change post types, profiles, reinforcement, hardware and quantities.
Before You Start: Confirm These Project Details
Before we confirm the installation arrangement, we normally ask for a few basic project details. A professional CAD drawing is not necessary for the first discussion. In many cases, a simple hand sketch, a marked site photo or a basic layout gives us enough information to start.
- Total fence length and required fence height.
- Number and position of corners, including 90-degree or other angles.
- Existing concrete, paved surface, wall, natural ground or mixed installation conditions.
- Approximate panel width or the supplier-recommended post centres.
- Gate type, clear opening and swing direction.
- Slopes, steps or uneven ground that may change the fence levels.
- Project location, especially where wind exposure, coastal conditions, frost or local structural requirements may affect the fixing method.
If you are still deciding what should be included in the order, see our guide to choosing a complete WPC fence system for wholesale and project orders.
Note: Why the Layout Matters Before Production
One thing we see quite often in export orders is that the total fence length is confirmed, but the corner and gate positions are still unclear. It may sound like a small detail, but it can change the number of posts, rails, profiles and gate accessories we need to prepare.
Even a simple hand sketch helps. Once we have the layout, we can work out the boards, posts, corner parts, rails, caps, fixings and gate hardware as one system before production.
Tools Needed to Install Composite Fencing
The exact tool list depends on how the posts will be fixed. For most projects, we suggest preparing a tape measure, string line or chalk line, spirit level or laser level, power drill, masonry drill bit, a suitable saw for WPC and aluminium, rubber mallet, post-hole digger or shovel, concrete mixing tools and the PPE required on site.
We recommend using clean, sharp tools and protecting the visible WPC and aluminium surfaces during cutting and handling. If the materials need to be stored before installation, keep the boards flat and fully supported and follow the storage instructions supplied with the product.
Check the Components Before Installation
Before installation starts, we always recommend checking that the boards, posts and accessories received on site match the installation drawing.
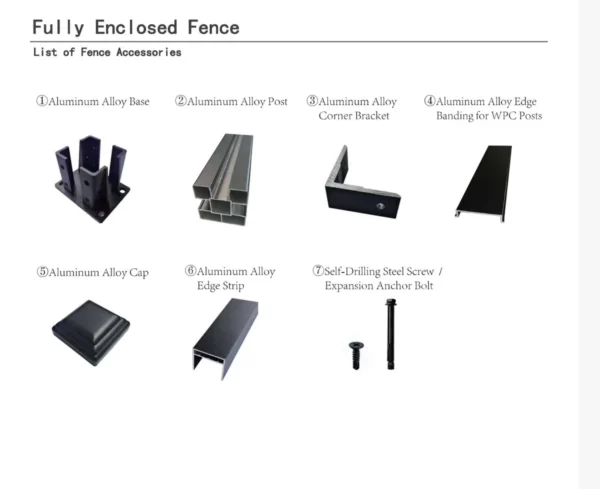
A typical modular WPC fence may use aluminium posts, bottom and top rails, post caps, connectors, finishing profiles, base plates and anchors where required. Gate sections will normally have their own frame and hardware.
From our experience with export projects, small accessories are worth checking before work starts. A missing connector or incorrect profile can stop an installation even when all of the WPC boards have arrived correctly.
This section is only a pre-installation check. For a more detailed explanation of what should be included when sourcing and comparing a complete fence package, see our complete WPC fence system buying guide.
Typical Composite Fencing System Example
The exact dimensions vary by model, but when we explain the system to customers, the installation logic is usually similar: aluminium post → bottom rail → WPC fence boards → top rail → post cap. On concrete, we normally use a matched base plate and anchors where the substrate is suitable. On natural ground, the usual solution is a longer post set into a concrete footing.
Before quotation, we recommend confirming the visible fence height separately from any post length that will be fixed below ground.
Step-by-Step: How to Install Composite Fencing
We always ask installers to follow the product-specific drawing supplied with the fencing system. The steps below are the general sequence we use when explaining most modular WPC fence installations.
Step 1: Set Out the Fence Line
We normally start by marking the start point, end point, corners and gate openings. A string line or laser level gives a clear straight reference. We then check the post positions against the actual product drawing rather than assuming that every composite fence system uses the same spacing.
For projects with several fence runs, we recommend labelling each section before drilling or excavation. It makes it much easier for the installation team to separate standard posts, corner parts, end profiles and gate components.
Step 2: Install the Composite Fence Posts
The fence posts control the alignment and stability of the whole system, so this is one step we never recommend rushing. Before the fixing becomes permanent, check each post again for position and vertical alignment.
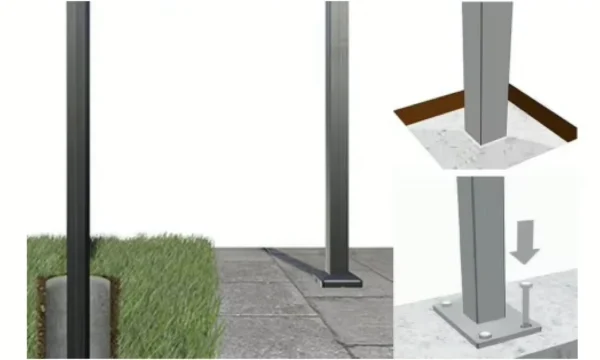
In the projects we handle, we normally see two main fixing methods: posts fixed to suitable existing concrete, or longer posts embedded into concrete footings on natural ground.
Option A: Install Composite Fence Posts on Existing Concrete
When the existing concrete is suitable, we normally use a matched aluminium base plate with the specified anchors. Position the base according to the layout, mark and drill the fixing holes, clean the holes and install the anchors. Before final tightening, we recommend checking the post alignment once more.
We do not assume that every patio slab or thin concrete topping is suitable for a fence post. Concrete condition, thickness, edge distance, fence height and wind exposure all matter. If there is any doubt, we recommend having the substrate and fixing method confirmed by the installer or project engineer.
Option B: Install Composite Fence Posts in Natural Ground
For gardens, landscaping and new construction areas, we normally recommend longer aluminium posts set into concrete footings. The installer excavates the post hole, prepares the base as required, positions the post and pours the concrete while keeping the post vertical and aligned with the fence line.
Some projects also use a drainage layer such as gravel at the bottom of the footing. We do not recommend copying footing dimensions from another supplier’s guide, because the correct depth and width depend on the actual post, fence height, soil, frost conditions and wind exposure.
Once the concrete has reached the required strength, the fence assembly can continue. We recommend avoiding any load or movement on the posts before the foundation has set sufficiently.
Note: Confirm Visible Height and Buried Post Length Separately
For a natural-ground installation, we normally confirm two dimensions: the finished fence height above ground and the extra post length that will go into the footing.
This sounds simple, but it avoids a surprisingly common misunderstanding. If a buyer asks for a 1.8 m fence, we still need to know whether 1.8 m means the visible height or the total post length.
Step 3: Install the Bottom Rail
We fit the bottom rail between the posts using the matched connectors or fixing method. This rail supports the first WPC fence board and gives the whole panel its horizontal reference.
We always check the rail is level before continuing. On a long fence run, even a small error at the first section can become very visible several panels later.
Step 4: Insert the WPC Fence Boards
We then insert the WPC fence boards between the aluminium posts and stack or connect them according to the system design. The boards should stay aligned, and we do not recommend forcing them tightly into the post channels.
Because WPC contains polymer material, it can move slightly as the temperature changes. We therefore keep the clearance specified for the actual product at the posts, profiles and board ends.
If on-site cutting is allowed for the supplied model, measure carefully and keep the cut ends clean. Use the specified finishing profile where an exposed edge requires protection or a cleaner appearance.
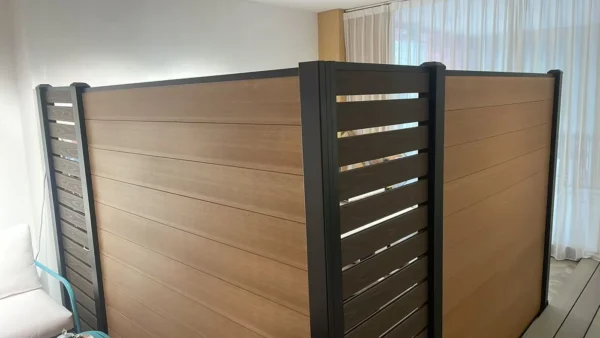
Step 5: Install the Top Rail
Once the boards reach the required height, position the top rail between the posts and secure it with the matched connector or fixing method. The top rail helps lock the panel assembly together and gives the upper edge a finished appearance.
Step 6: Fit Post Caps and Finishing Profiles
Install the post caps, corner profiles, end strips and any other finishing parts supplied with the system. Check that there are no sharp edges, loose fixings or visible gaps outside the designed clearances.
Clean the WPC and aluminium surfaces and remove installation debris before the final inspection.
Installing Composite Fencing on Concrete vs Natural Ground
When customers ask us about concrete versus natural ground, the main difference we explain is the way the posts are fixed.
Existing concrete: the typical solution is an aluminium post combined with a matched base plate and anchors, provided the concrete substrate is suitable for the proposed load.
Natural ground: the typical solution is a longer post embedded into a concrete footing. Base plates may not be required for these sections.
For projects with mixed conditions, both methods can be used in different fence sections. The order and packing list should clearly identify which post lengths and accessories belong to each area.
Note: Mixed Installation Conditions
Some projects use more than one fixing method—for example, concrete in one area and natural ground in another. In that case, we recommend marking each fence run on the layout before production.
We can then separate the surface-mount posts, longer embedded posts and matching accessories by section. This makes installation easier and reduces the chance of needing replacement parts after the shipment has arrived.
How to Install Composite Fencing on a Slope or Uneven Ground
We can often adapt composite fencing to sloping or uneven ground, but we prefer to agree the layout before production. The most common solution is stepped panels, although some systems can also use a raked or adapted arrangement.
With stepped installation, each fence section remains level while the next section starts at a different height. This works well with many modular WPC systems, but it changes the visible post height and the gap near the ground.
Before we prepare the order, we ask for the slope direction, the level difference between sections and the preferred bottom gap. Even a basic elevation sketch can prevent mistakes in post lengths, panel quantities and finishing profiles.
Can Composite Fencing Be Installed on Existing Posts?
We are sometimes asked whether new WPC fence boards can be fitted to existing timber, steel or concrete posts. It can be possible, but we first need to check the condition, spacing and geometry of the existing posts and whether a compatible adaptor or channel is available.
Before we recommend reusing existing posts, we check their spacing, vertical alignment, structural condition and how the new WPC boards or profiles would connect. If the posts are deteriorated, irregularly spaced or unsuitable for the new system, a matched aluminium post system is usually the cleaner and more predictable option.
Corners, L-Shapes, T-Shapes and Gates
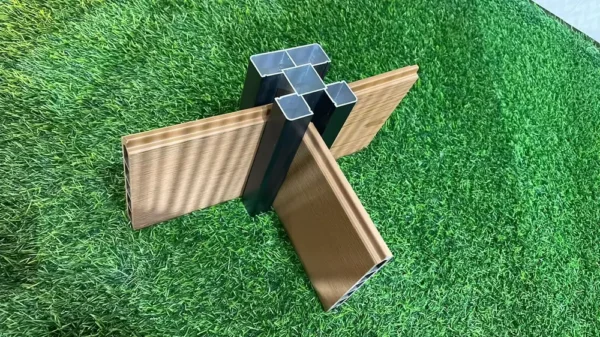
Straight sections are usually the easiest part of a composite fence installation. Corners and junctions may require multi-direction posts, removable post inserts, corner profiles or system-specific connectors.
Some WPC fencing systems can form straight runs, L-shaped layouts and T-shaped junctions using the same post body with different insert positions, while others use dedicated corner posts. Confirm the actual profile design before quantities are finalized.
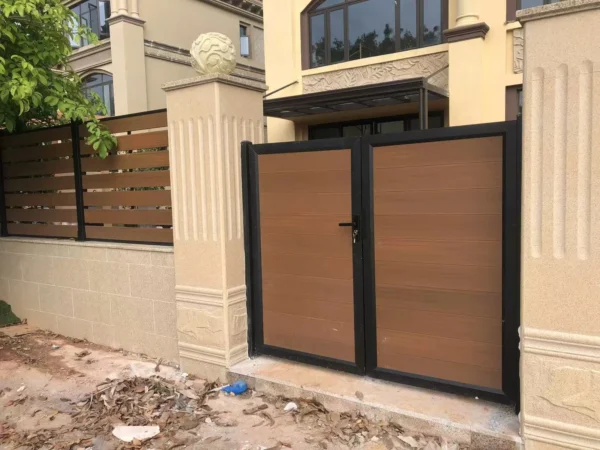
For gates, confirm the single- or double-leaf design, required clear opening, frame size, swing direction, post positions, hinges, handle, lock, stop and reinforcement before production. A gate should be included in the layout before the fence panels are counted because it can change post quantities and opening dimensions.
Note: Gate Clear Opening vs Gate Frame Size
For gates, we prefer to confirm the required clear opening rather than only the nominal gate size. The usable passage after the leaves, hinges and posts are installed may be smaller than the outside frame dimension.
This is especially important with double-leaf gates when the opening needs to accommodate furniture, equipment or other large items.
Expansion Gaps and Thermal Movement
WPC is more dimensionally stable than natural wood in many outdoor conditions, but it still contains polymer and can move slightly with temperature changes. The required clearance depends on the board profile, board length, colour, installation temperature and the way the board is captured by the aluminium system.
Use the clearance stated on the actual installation drawing. Do not force boards tightly against the post or profile where a gap is specified, and do not copy an expansion value from another product with a different board length or formulation.
Common Composite Fence Installation Mistakes to Avoid
Common mistakes include:
- Comparing only the WPC board price and forgetting posts, rails, caps, connectors, anchors and gate hardware.
- Using post spacing from another fencing brand instead of the actual product drawing.
- Fixing posts before checking the complete fence line and gate opening.
- Using a surface-mounted base plate on concrete that is not suitable for the proposed load.
- Copying a footing size from another project without considering local soil and wind conditions.
- Ignoring expansion clearances and forcing WPC boards tightly into the post channels.
- Planning the gate after the fence quantities have already been finalized.
- Mixing accessories from different systems because the profiles look similar in photos.
- Failing to protect visible WPC and aluminium surfaces during storage, cutting and installation.
Practical Installation Tips for Contractors
For installers and contractors:
- Check the approved layout, post centres, corner details and gate openings before drilling or excavation.
- Separate components by fence section so the correct posts, rails, caps and fixings are easy to identify.
- Use one reference line and re-check post alignment before anchors are tightened or concrete sets.
- Install one complete test section first when the team is using a new fencing system for the first time.
- Keep WPC boards flat and supported before installation and protect aluminium profiles from scratching.
- For larger projects, photograph foundations, post fixings and gate reinforcement before they are covered.
- Keep the supplier installation drawing on site instead of relying only on memory or a generic online guide.
Project Example: From Layout to a Complete Fencing BOM
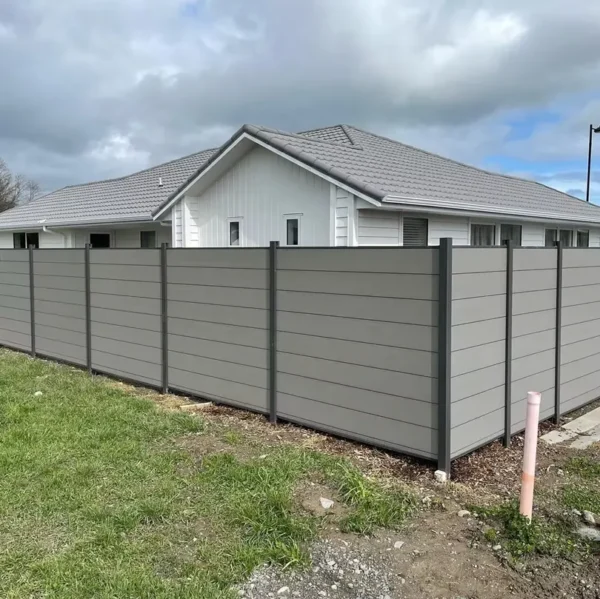
Here is a simple example of the information we may receive for an overseas project:
- 50 linear metres of composite fencing.
- 1.5 m finished fence height.
- 1 × 90-degree corner.
- Natural-ground installation.
- 1 × double-leaf gate with a required clear opening of 2.0 m.
For a project like this, quoting only the WPC boards is not enough. We also need to check the standard posts, corner solution, longer posts for the concrete footings, top and bottom rails, post caps, finishing profiles, fixings and the complete gate hardware.
The exact quantities depend on the selected fence model and layout, but confirming these details before production is one of the easiest ways to avoid missing parts after delivery.
Before We Check the Installation Arrangement
If you are planning a fencing project, send us the layout, required finished height, ground conditions and gate details. We can review the installation arrangement with you and check that the correct system components are prepared before production.
If you are preparing an RFQ or comparing supplier quotations, see our complete WPC fence system buying guide.
Frequently Asked Questions
How far apart should composite fence posts be?
Post spacing depends on the panel length, post design, fence height and project conditions.
Do composite fence posts need concrete?
For natural-ground installation, longer posts are commonly secured in concrete footings. On suitable existing concrete, a matched base plate and anchor system may be used instead.
How deep should composite fence posts be?
There is no universal footing depth for every composite fencing system. The required depth depends on the post design, fence height, soil condition, frost conditions, wind exposure and local structural requirements. Follow the dimensions specified for the supplied system and project.
Can composite fencing be installed without concrete?
In some projects, posts can be surface-mounted to a suitable structural concrete base using matched base plates and anchors. Natural-ground installations commonly use concrete footings. The correct fixing method depends on the substrate and system design.
Can composite fencing be installed on uneven ground?
Yes. Many projects use stepped fence sections. Post heights, bottom gaps and panel levels should be reviewed before ordering so the correct quantities and post lengths are supplied.
Does WPC fencing need expansion gaps?
Yes, most WPC fencing systems require some allowance for thermal movement. Follow the product-specific clearance stated for the supplied fence board and post system.
Can composite fencing be cut to size?
Many WPC fencing products can be cut on site with suitable tools, but this depends on the profile and system design. Confirm whether cutting is allowed for the supplied model and which finishing profile should be used on exposed cut edges.
How much does composite fence installation cost?
Installation cost depends on fence length and height, ground condition, foundations, gate requirements, labour and local logistics. For product comparisons, it is more useful to compare the cost of the complete fencing system rather than only the WPC board price.
Why Work With GreenCovering for Composite Fencing?
We supply WPC fencing as a complete system for overseas buyers, rather than supplying the fence boards alone.
Depending on the model and layout, we can match the WPC boards with aluminium posts, top and bottom rails, post caps, base plates, corner and end profiles, connectors, fixings and gate accessories.
For distributors, contractors and project buyers, this makes the project easier to coordinate and reduces the risk of finding that locally sourced profiles or hardware do not fit the supplied boards. Before quotation or production, we can review the fence length, height, corners, fixing surface and gate requirements with you and prepare the parts as one coordinated package.
If you are planning a fencing project, send us your basic layout, required height, installation surface and gate details. We can review the system with you, check the accessory list and point out any details that should be confirmed before quotation.
Ready to discuss a project? Contact our team and send us your layout or site photos.